free software song

ဒီသီခ်င္းေလးဟာ က်ေနာ္တို႔ Free Software ကမၻာကေရးထားတဲ႔ သီခ်င္းေလးတစ္ပုဒ္ပါ ..
သီခ်င္းေရးထားတဲ႔သူကေတာ႔ Richard Stallman ျဖစ္ပါတယ္ .. ခံစားၾကည့္ပါဗ်ား .. :-)
ခုက်ေနာ္တင္ထားတဲ႔ သီခ်င္းေလးက Rhythmic version ပါ ..

free software song rhythmic

[To the melody of Sadi Moma:]

Join us now and share the software;
You'll be free, hackers, you'll be free.
x2

Hoarders may get piles of money,
That is true, hackers, that is true.
But they cannot help their neighbors;
That's not good, hackers, that's not good.

When we have enough free software
At our call, hackers, at our call,
We'll throw out those dirty licenses
Ever more, hackers, ever more.

Join us now and share the software;
You'll be free, hackers, you'll be free.
x2


အကယ္၍ streamline နားေထာင္ခ်င္ပါက ေအာက္ကလင္႔ေလးကို ကူးယူၿပီး သီးသန္႔ browser tab မွာျဖစ္ျဖစ္၊ တျခား player တစ္ခုခုႏွင္႔ပဲျဖစ္ျဖစ္နားေထာင္ႏိုင္ပါတယ္ ခင္ဗ်ား ..

http://www.gnu.org/music/free-software-song-rhythmic.mp3

source: http://www.gnu.org/music/free-software-song.html

have fun! :D

twitter from terminal

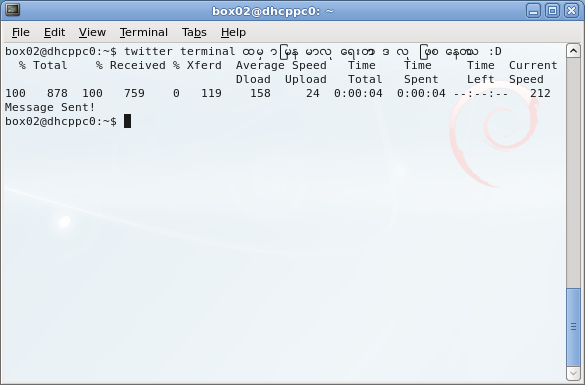
ဒီည က်ေနာ္ twitter home page ကိုသြားတာ ကိုေနယံဦးရဲ႕ tweet တစ္ခုမွာ "Twitting from the Linux Command Line" လင္႔ေလးေတြ႔တယ္၊ စမ္းၾကည့္တာေပါ႔ :-) သူက cURL နဲ႔အလုပ္ လုပ္တာေလ .. မိုက္တယ္ မဆိုးဘူး :D ျမန္မာလုိတြတ္ၾကည့္တယ္ .. Terminal ထဲမွာဆိုေတာ႔ မျမင္မစမ္း မွန္းရိုက္ရတာေပါ႔ .. အဓိကကေတာ႔ အလုပ္လုပ္ဖို႔ပဲေနာ္ :-) လုပ္နည္းကေတာ႔ အေပၚကလင္႔မွာပဲၾကည့္လိုက္ေနာ္ .. ေက်းဇူး ကိုေနယံဦးေရ .. :)

twitter-terminal
Twitting from Terminal

gbrainy နဲ႔ ဦးေႏွာက္အလုပ္လုပ္ျခင္း

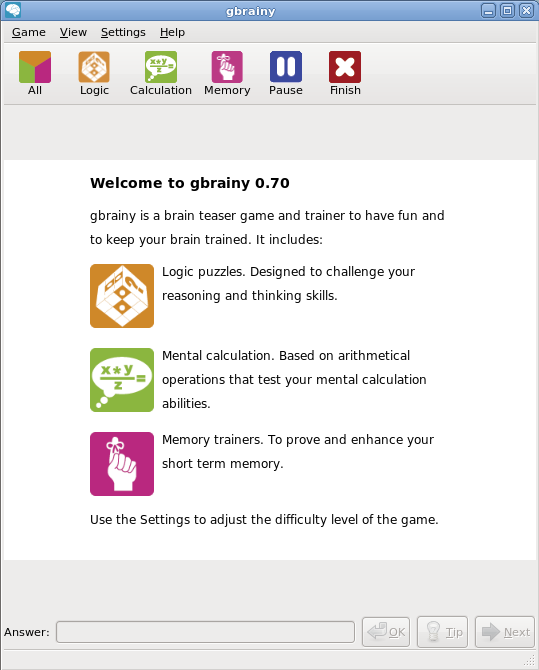
တခါတေလ ကိုယ္႔ဦးေႏွာက္သံုးလို႔မရေတာ႔ဘူး၊ ျဖတ္ထိုးဥာဏ္ေတြမရွိေတာ႔ဘူး၊ မွတ္ဥာဏ္ေတြ မေကာင္းေတာ႔ဘူးလို႔ ကိုယ္႔ကိုကိုယ္ေတြးမိဖူးလား? :D က်ေနာ္ေတာ႔ တခါတေလ အဲလိုေလး ေတြးမိတက္တယ္။ ဓါးမ်ားလိုေပါ႔ မေသြးပဲထား တံုးတက္တယ္ေျပာၾကသလို ဦးေႏွာက္ကိုလည္း ထက္ျမတ္ေအာင္ ေသြးေပးဖို႔လိုမယ္ထင္ပါတယ္။ ( အဟဲ စာေရးဆရာေလသံနဲ႔ :P ) ဥာဏ္ရည္ဥာဏ္ေသြးထက္ျမတ္ဖို႔အတြက္ ေပ်ာ္ေပ်ာ္ပါးပါး ကစားၾကရေအာင္လား သူငယ္ခ်င္းတို႔။ :-) ဒီ gbrainy software ကို Linux Platform မွာေရာ Windows Platform မွာပါ install လုပ္ႏိုင္ပါတယ္။ Windows အတြက္ကိုေတာ႔ ထံုးစံ အတိုင္း sourceforge.net မွာ ရယူႏိုင္ပါတယ္။

[caption id="attachment_116" align="alignnone" width="480" caption="gbrainy"]gbrainy[/caption]
gbrainy

a c++ program

/*
this is a program to demonstrate the basics of
a c++ programme, it includes comments,
header files, the main() function and cout
*/

#include <iostream>
using namespace std;

int main()
{
cout<<"Hello World!\n";
return 0;
}

vim syntax on

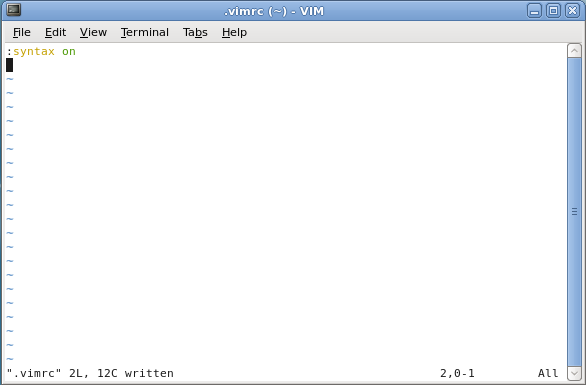
Ubuntu မွာတုန္းက vim-full ကို install လုပ္ၿပီးလ်င္ vim syntax highlight က အလိုအေလွ်ာက္ on ၿပီးသားပါ။ ဒါေပမယ္႔ က်ေနာ္႔ debian lenny မွာ အလိုအေလွ်ာက္ on ျဖစ္မေနအတြက္ က်ေနာ္ .vimrc ဖိုင္ကို အသစ္လုပ္ေပးၿပီး on ရပါတယ္။ လုပ္ပံုကေတာ႔ Terminal ထဲမွာ ေအာက္ကအတုိင္း vim နဲ႔ပဲ အဲဒီဖိုင္အသစ္ကိုေဆာက္ေပး လိုက္ပါတယ္။ ၿပီရင္ အဲဒီဖိုင္ထဲမွာ ':syntax on' ဆိုၿပီးရိုက္ထည့္ေပးလိုက္ပါတယ္။ ေအာက္မွာ Terminal ထဲမွာ ရိုက္တဲ႔ command line နဲ႔ ဖိုင္ထဲမွာ ရိုက္ထည့္ထားတာကို ေတြ႕ရမွာပါ။

$ vim ~/.vimrc

[caption id="attachment_118" align="alignnone" width="480" caption=".vimrc file"].vimrc file[/caption]

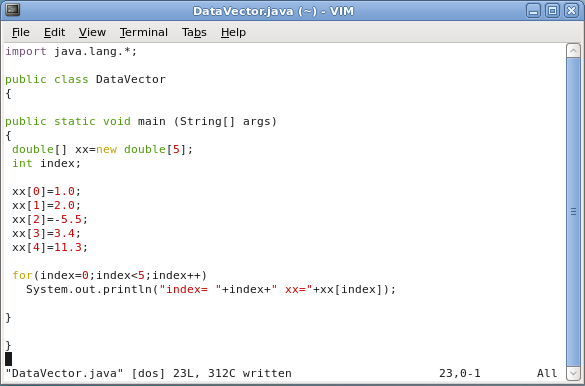
ၿပီးရင္ ဖိုင္ကို သိမ္းဆည္းၿပီးပိတ္ပါ။ အဲဒီဖိုင္ေလး effect ျဖစ္ဖို႔အတြက္ Logout လုပ္ေပးလိုက္ပါ။ Login ျပန္ၿပီး vim နဲ႔ source file ေတြျပန္ဖြင္႔တဲ႔အခါ syntax highlighting on ေနတာ ေတြ႕ရပါလိမ္႔မယ္။

[caption id="attachment_119" align="alignnone" width="480" caption="syntax on"]syntax on[/caption]

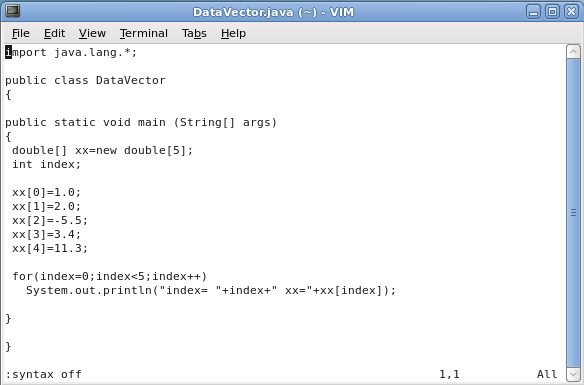
အကယ္၍ run time မွာပဲ syntax off ခ်င္တယ္ဆိုရင္ vim ကို ':syntax off' command ေပးလိုက္လ်င္ syntax highlight off ျဖစ္သြားမွာပါ။

[caption id="attachment_120" align="alignnone" width="480" caption="syntax off"]syntax off[/caption]

vim ရဲ႕ မ်က္စိေအးတဲ႔ syntax highlight color နဲ႔ code ေတြကို ေပ်ာ္ရႊင္စြာေရးႏိုင္ပါေစ .. :-)

compile && execute in gedit

Source code ေတြကို vim မွာေရးၿပီး Terminal မွာပဲ တခါတည္း compile & execute လုပ္တာက GUI အားသန္သူမ်ားအတြက္ မကိုက္လွပါဘူး။ စတင္သူမ်ားက gedit နဲ႔လုပ္ခ်င္မွာပဲေလ၊ လြယ္လဲ လြယ္ကူပါတယ္။ gedit ဟာ တကယ္႔ကို powerful text editor ျဖစ္တဲ႔အျပင္ သူ႔ရဲ႕ plugin ေတြသံုးၿပီး simple program ေလးေတြကိုပါ ေလ႔လာလို႔ရတဲ႔ powerful tool တစ္ခုျဖစ္ပါတယ္။ ဥပမာ C++ ကိုစတင္ေလ႔လာလိုသူမ်ားအတြက္ gedit ကိုသံုးၿပီး C++ source file ကို ဘယ္လို compile လုပ္ၿပီး execute လုပ္တယ္ဆိုတာ တင္ျပေပးမွာပါ။
အရင္ဦးဆံုး gedit plugin ျဖစ္တဲ႔ External Tools ကို Activate လုပ္ရေအာင္ ..
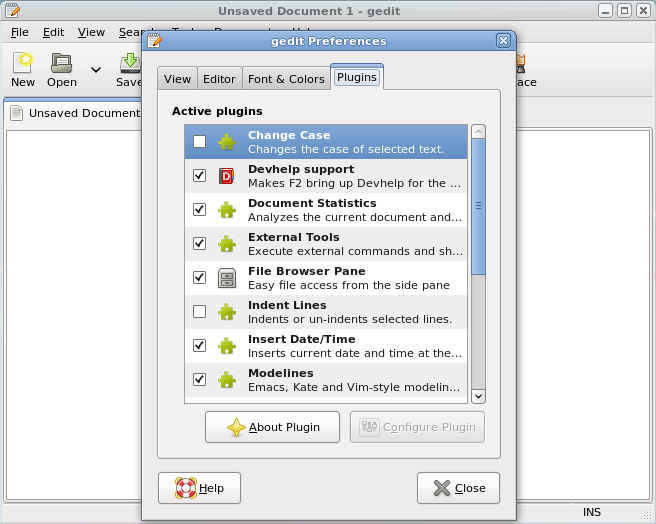
gedit ကိုဖြင္႔ပါ .. Edit > Preferences ကို သြားပါ .. gedit Preferences Window ေလးေပၚလာ မယ္ .. Plugins Tab ကို ဆက္သြားမယ္ .. အဲဒီမွာ External Tools plugin ကို check box မွာ mark လုပ္ေပးၿပီး Activate လုပ္ေပးပါ [see:fig-1] ..

[caption id="attachment_122" align="alignnone" width="480" caption="Figure 1"]Figure 1[/caption]

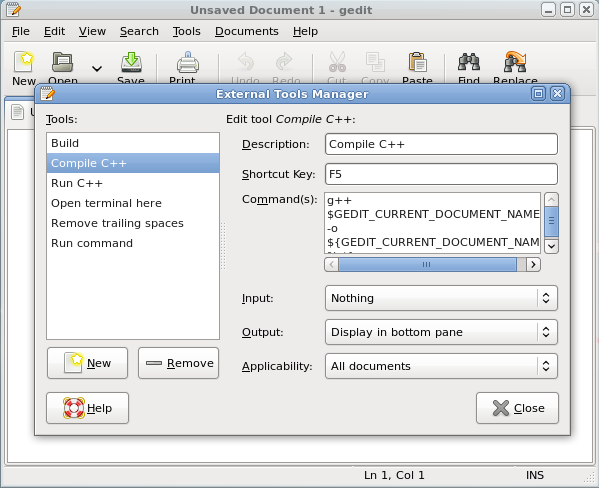
ၿပီးရင္ gedit > Tools > External Tools ကိုဖြင္႔ပါ .. External Tools Manager Window [see:fig.3] ေလးေပၚလာမယ္ .. အဲဒီမွာ Tools အသစ္ႏွစ္ခုကို New buttom ေလးသံုးၿပီးေတာ႔ ထည့္ေပးရေအာင္ .. ပထမတစ္ခုကို "Compile C++" ႏွင္႔ ေနာက္တစ္ခုကိုက်ေတာ႔ "Run C++" လို႔နာမည္ေပးရေအာင္ .. ဒါေပမယ္႔ အဆင္ေျပသလို နာမည္ေပးႏိုင္ပါတယ္ .. အဓိကကေတာ႔ ကိုယ္သိဖို႔ပါပဲ [see:fig-2] ..

[caption id="attachment_123" align="alignnone" width="480" caption="Figure 2"]Figure 2[/caption]

Compile C++ အတြက္ျဖည့္ရမယ္႔ ဟာေတြကေတာ႔ ..
Description: Compile C++ by using g++
Accelerator: F5
Command(s): g++ $GEDIT_CURRENT_DOCUMENT_NAME -o ${GEDIT_CURRENT_DOCUMENT_NAME%.*}
Input: Nothing
Output: Insert in output panel
Applicability: All documents

Run C++ အတြက္ျဖည့္ရမွာကေတာ႔ ..
Description: Run C++
Accelerator: F6
Command(s): ./${GEDIT_CURRENT_DOCUMENT_NAME%.*}
Input: Nothing
Output: Insert in output panel
Applicability: All documents

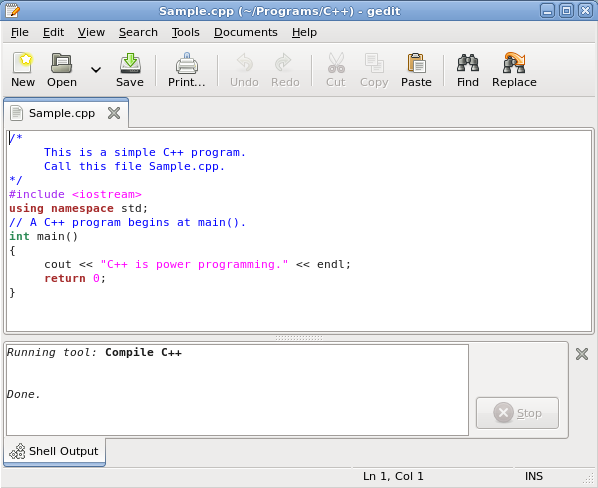
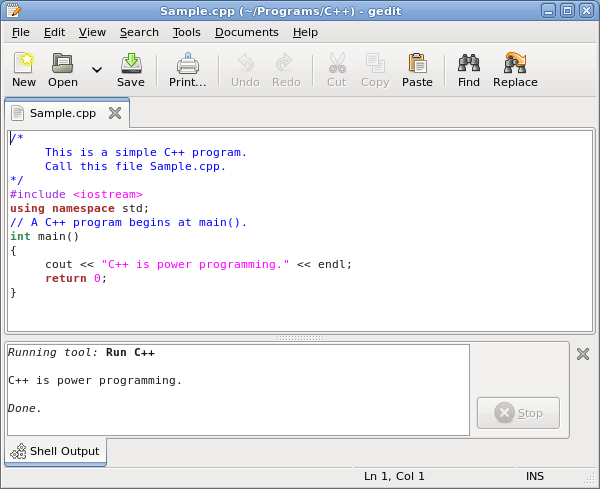
အဲလိုျဖည့္ေပးလိုက္တဲ႔အတြက္ gedit မွာ C++ source code ကို view ၾကည့္ရာကေန F5 ႏွိပ္ေပးလိုက္ရင္ g++ က အဲဒီ source file ကို compile လုပ္ေပးၿပီး F6 ကို ႏွိပ္လိုက္ရင္ shell က execute လုပ္ေပးပါလိမ္႔မယ္။ ဒါမွမဟုတ္လဲ gedit > Tools ကိုသြားၿပီး dropdown menu ကေန Compile C++ နဲ႔ Run C++ တို႔ကို သံုးႏိုင္ပါတယ္။

Compiling C++ souce file
[caption id="attachment_124" align="alignnone" width="480" caption="Figure 3"]Figure 3[/caption]

Executing C++ program
[caption id="attachment_125" align="alignnone" width="480" caption="Figure 4"]Figure 4[/caption]

အကယ္၍ Terminal ထဲမွာပဲ compile && execute လုပ္ခ်င္လ်င္ေတာ႔ ..

$ g++ -o Sample Sample.cpp

$ ./Sample

Sample ဆိုတာက compile လုပ္ၿပီးရလာမယ္႔ output file (program) ပါ၊ Sample.cpp ကေတာ႔ input file (c++ source file) ပါ။ စတင္မယ္႔သူမ်ား အစျပဳႏိုင္ၿပီလို႔ ေမွ်ာ္လင္႔ပါတယ္ .. :-)
every breath you take

က်ေနာ္ႀကိဳက္တဲ႔ သီခ်င္းေလးတစ္ပုဒ္ပါ။ The Police အဖြဲ႕က ဒီသီခ်င္းေလးကိုဆိုထားတယ္ေလ .. :-)

[audio:EveryBreathYouTake.mp3]

no sound on my debian lenny

က်ေနာ္ ဒီညေနအလုပ္ကျပန္လာၿပီး အိမ္ေရာက္ေတာ႔ ကြန္ပ်ဴတာဖြင္႔လိုက္ေတာ႔ သတိထားမိတာေလးက Task Bar ေပၚက speaker ေလးမွာ အနီေရာင္ၾကက္ေျခခက္ေလး ထူးထူးျခားျခားေတြ႕ရတယ္။ အဲဒါနဲ႔ က်ေနာ္ Skype call testing နဲ႔ အသံကို စမ္းၾကည့္ပါ တယ္။ အလုပ္မလုပ္ဘူး၊ Audio Setting ကိုၾကည့္ေတာ႔ default setting မဟုတ္ပဲ usb audio device ဘာညာကိကြဆိုၿပီးေပၚေနတယ္၊ က်ေနာ္က Labtec Webcam Pro မွာတြဲပါ လာတဲ႔ usb audio ကိုအရင္ကတည္းကမသံုးဘူးေလ .. အဲလိုေပၚလာေတာ႔ က်ေနာ္ အရင္ driver ကိုျပန္ေျပာင္းၿပီး စမ္းၾကည့္တာေပါ႔ .. စမ္းၾကည့္တာေတာ႔ အဆင္ေျပပါတယ္။ ဒါေပမယ္႔ က်ေနာ္ Podcasts နားေထာင္ဖို႔ Rhythmbox ကိုဖြင္႔တယ္၊ RFA podcasts ကို Play တယ္ အသံမၾကားရဘူး error တက္လာတယ္။ ေနာက္ၿပီး Radio ေတြဖြင္႔ေတာ႔လဲ error တက္လာတယ္။ MPlayer နဲ႔ Movie ဖြင္႔ၾကည့္ေတာ႔လဲ audio error တက္လာတယ္။ က်ေနာ္ တခ်က္ေခါင္းနပမ္းၾကီးသြားတယ္။ စိတ္ကအလြယ္လိုက္ၿပီး အသစ္ျပန္ Install လုပ္ဖို႔ ၾကံစည္လိုက္ေသးတယ္။ မျဖစ္ဘူးေလလို႔ ျပသာနာေျဖရွင္းတဲ႔ အခ်ိန္နဲ႔ အသစ္ install လုပ္တဲ႔အခ်ိန္နဲ႔က တူတူေလာက္လဲေနမွာလို႔ ေျဖရွင္းလိုက္တာ ေကာင္းခ်ည္ရဲ႕ ဆိုၿပီး ျပသာနာရဲ႕အေျဖကိုရွာတာေပါ႔ .. အဲဒီမွာ alsaconf နဲ႔ sound module ကို configure ျပန္လုပ္လိုက္တာ အဆင္ေျပေပမယ္႔၊ Reboot လုပ္လိုက္ရင္ အရင္အတိုင္း error ထပ္ျပန္ျပတယ္။ က်ေနာ္ စိတ္နည္းနည္းပိုပူသြားတယ္။ ဘာျဖစ္ပါလိမ္႔ေပါ႔ .. ေခါင္းလဲနည္းနည္းေနာက္သြားတယ္ .. လုပ္ေနရင္းတန္းလန္းကို မရတာဆိုေတာ႔ .. စဥ္းစားရင္းနဲ႔ ေနာက္ဆံုးက်ေတာ႔ ဖ်က္ကနဲ အလင္းတန္းတစ္ခုထိုးက်လာတယ္ :-P ဒီ usb audio ေၾကာင္႔လားမသိဘူးေပါ႔လို႔ ဆိုၿပီး Reboot ျပန္လုပ္ၿပီး alsaconf ကို မ Run ခင္ sound module ကိုေခၚၾကည့္တယ္၊ မဟုတ္မွလြဲေရာ ဒီေကာင္က က်ေနာ္႔ onboard sound driver မတက္ခင္သူက အရင္တက္ေနတာကိုး .. အဲဒါနဲ႔ သူ႔ကိုလဲေနရာေပး လိုက္ေတာ႔ အဆင္ေျပသြားတယ္။ :-)

ေျဖရွင္းလိုက္ပံုက ပထမဆံုးစက္ကို reboot လုပ္လုိက္တယ္။ ၿပီးေတာ႔ ဘာ sound module တက္ေနတယ္ဆိုတာ စစ္ေဆးတယ္ ..

box02@dhcppc0:~$ su
Password:
dhcppc0:/home/box02# cat /proc/asound/modules
0 snd_usb_audio


dhcppc0:/home/box02#


ဒီလိုျပေနေတာ႔ usb audio ကအရင္တက္ေနတာေတြ႕ရတယ္ .. အမွန္တကယ္ဆိုရင္ ကိုယ္႔ဆီမွာအလုပ္လုပ္ေနတဲ႔ onboard audio card က အရင္တက္ႏွင္႔ရမွာ .. ဒီေနရာမွာ ကိုယ္႔ onboard audio card က အလုပ္လုပ္တယ္လို႔ေျပာႏိုင္တာဟာ alsaconf ေၾကာင္႔ ပါပဲ .. က်ေနာ္ alsaconf ကို run ၿပီးတဲ႔အခ်ိန္မွာ အသံေတြျပန္ထြက္လာတယ္။ အဲဒီေတာ႔ alsa က ကိုယ္႔ရဲ႕ ဘာ sound card ကိုအလုပ္လုပ္ေစႏိုင္လဲဆိုတာ သိတယ္ေလ .. alsaconf ကို run ၿပီးတဲ႔ အခ်ိန္မွာ sound module ကိုျပန္ check ၾကည့္တဲ႔အခါ ..

dhcppc0:/home/box02# cat /proc/asound/modules
0 snd_intel8x0


ဒီလိုေပၚေနတာမို႔လို႔ က်ေနာ္႔ onboard sound card "snd_intel8x0" အလုပ္လုပ္တယ္ ဆိုတာေျပာႏိုင္တာေပါ႔ေနာ္ .. ဒါေပမယ္႔ က်ေနာ္ေျပာခဲ႔တဲ႔အတိုင္း reboot ျပန္လုပ္လိုက္တဲ႔အခါ usb_audio က အရင္ျပန္တက္လာတာမို႔ reboot လုပ္လုိက္တိုင္း alsaconf ကို run ေပးေနရမယ္ဆိုရင္ေတာ႔ အလုပ္မျဖစ္ဘူးေလ .. အဲဒါေၾကာင္႔ ဒီျပသာနာကို ေျဖရွင္းတဲ႔နည္းက usb_audio sound အတြက္ေနရာေလးေပးဖို႔ပါပဲ .. လုပ္လိုက္တာကေတာ႔

$ su


# gedit /etc/modprobe.d/sound


ကိုဖြင္႔ၿပီး ေအာက္က တစ္လိုင္းကို ထပ္ထည့္ေပးလိုက္တာပါပဲ ..

options snd_usb_audio index=1


အဲဒါေလးမထည့္ေပးပဲ ပံုမွန္ အတိုင္းဆိုရင္ က်ေနာ္႔ sound file မွာ default အေနနဲ႔

alias snd-card-0 snd-intel8x0
options snd-intel8x0 index=0


အဲလိုေလးပဲရွိေနမွာပါ။ အဲဒါေၾကာင္႔ ဟိုတစ္ေၾကာင္းကိုထည့္ေပါင္းေပးလိုက္ေတာ႔   /etc/modprobe.d/sound ဖိုင္မွာ ဒီေအာက္ကလိုေလးျဖစ္သြားတာပါ။

alias snd-card-0 snd-intel8x0
options snd-intel8x0 index=0
options snd_usb_audio index=1


ဖိုင္ကို သိမ္းၿပီးေတာ႔ က်ေနာ္ reboot ျပန္လုပ္ေပးလိုက္တာ အားလံုးကို အဆင္ေျပသြား တာပါပဲခင္ဗ်ား .. အဲဒါေၾကာင္း ျပသာနာဆိုေရွာင္မေျပးပဲ နဖူးေတြ႕ဒူးေတြ႕၀င္ေျဖ ရွင္းတာေကာင္းတယ္လို႔ ပညာရပါေၾကာင္းပါ ခင္ဗ်ား ... :-)

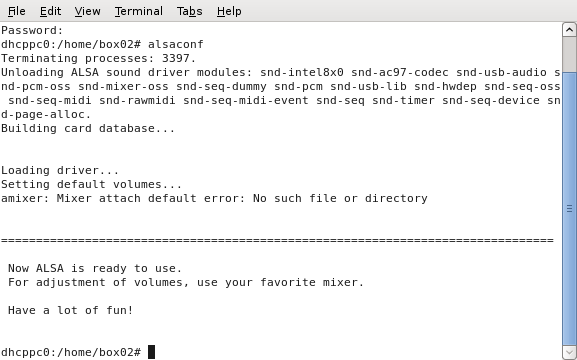
ေအာက္မွာ alsaconf ကို terminal ကေန run တဲ႔ပံုပါ ..
[caption id="attachment_127" align="alignnone" width="480" caption="alsaconf"]alsaconf[/caption]